Blogging 101 – How to Setup an Amazing WordPress Blog in Just a Couple of Hours
In these step-by-step instructions and video tutorials, you’ll learn how to setup a WordPress blog in just a couple of hours – from buying a domain name (URL), setting up a hosting server, email forwards, WordPress installation and configuration, installing important plugins, Search Engine Optimization (SEO), and a few additional tutorials on how to be an amazing blogger.

Before we begin, here are two clips that will help you understand why you might want to set up your own blog:
httpv://www.youtube.com/watch?v=rZ55f_svLuM
httpv://www.youtube.com/watch?v=oYKqEqg9bgg
Ready to start?
1. Purchasing a domain name + hosting service:
Domain name is simply the URL you’ll be using (like YAHOO.com or CNN.com). When you buy a domain name you’re really buying the rights to use that name for a limited time. Hosting, on the other hand, means a physical space on someone’s hard-drive (server) where your blog’s/website’s files will be stored. To have a website or a blog you’ll need both. When visitors type your domain URL into their browser, they will be redirected to the files stored on your hosting service. You can purchase the domain name separately from the hosting but it’s not recommended since most hosting services (like Bluehost, 1&1, etc) will give you 1, 2 or 3 free domains with your hosting service (GoDaddy, for example, do no give free domain with their hosting so you’ll have to pay for both if you want a domain as well).
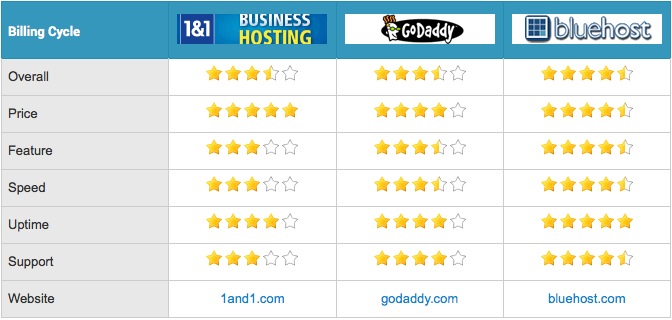
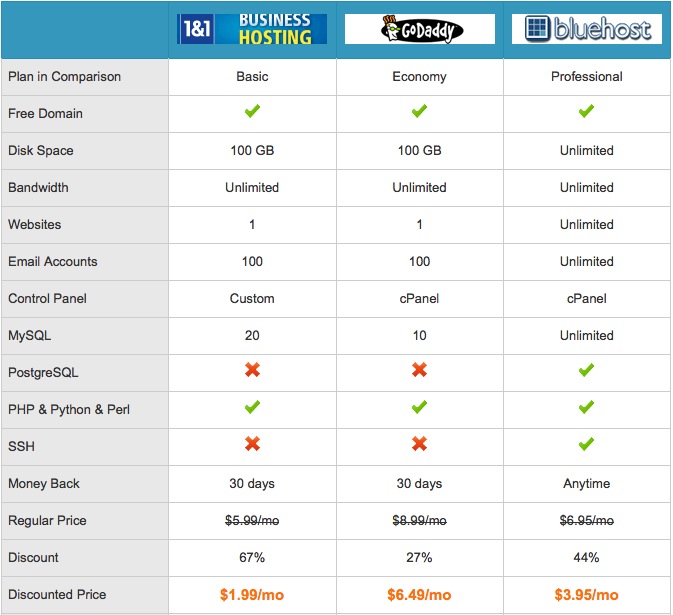
My personal choice for hosting/domain provider is Bluehost. I’m sure you’ve heard of GoDaddy but I find Bluehost to have way better page-load–time, customer service, prices, features and overall experience. 1&1 offers a month-by-month payment package (which can be a plus if you just need hosting/domain for a few months) but be aware that the month-by-month plan is more expensive long-term. Their customer support is ok once you manage to get a hold of them on the phone (which I found challenging at times). I’m not a big fan of GoDaddy even though they are probably the most well known provider. They are more expensive overall, you get less for your $$$, and their customer service is bad in my experience. Here’s a detailed comparison between the three:
Before choosing a domain name, think about YOU as a BRAND. What would you like people to know about you? How would you like others to perceive you? To identify your self-branding goals, you can use these tools:
TOOL: Personal Branding Creative Brief
TIP: 12 Excellent Tools for Picking a Domain Name
USEFUL: Bluehost | Customer / Tech Support: 1 (888) 401-4678
IMPORTANT: You want the Linux hosting (default) and not the Windows hosting, even if you have a Windows operating system.
httpv://www.youtube.com/watch?v=VA8qvOdfgmo
NOTE: The hosting packages shown in this video may have changed. Visit Bluehost for current packages & pricing.
2. Installing WordPress with in a one-click-super-easy-let’s-do-it-go-go-go:
w/ Bluehost: Login to your account and:
httpv://www.youtube.com/watch?v=N7aZdkZieOc
w/ HostGator: Login to your account and (jump to minute 4:10 and watch up to minute 6:00, just 2min of instructions):
httpv://www.youtube.com/watch?v=Q9nTCps9sow#t=4m10s
w/ A2Hosting: Login to your account and
httpv://www.youtube.com/watch?v=_MnTiFHrQ9k
If you need further assistance, call your hosting provider’s Tech Support line.
3. Logging in to your WordPress blog for the first time:
Once you’re done with the installation process, go ahead and visit your wordpress’ dashboard:
http://YourDomnainName.com/wp-admin (obviously replace YourDomainName.com with your own domain name). If, for some reason, you can’t remember your login password, you can use the ‘Lost Your Password?’ link. An alternative way to login (if, for some reason, you still can’t login) is via Bluehost.com or your hosting provider (if not Bluehost).
Here’s a video about the WordPress Dashboard:
httpv://www.youtube.com/watch?v=uMwYbcIEOQE
4. Configuring WordPress:
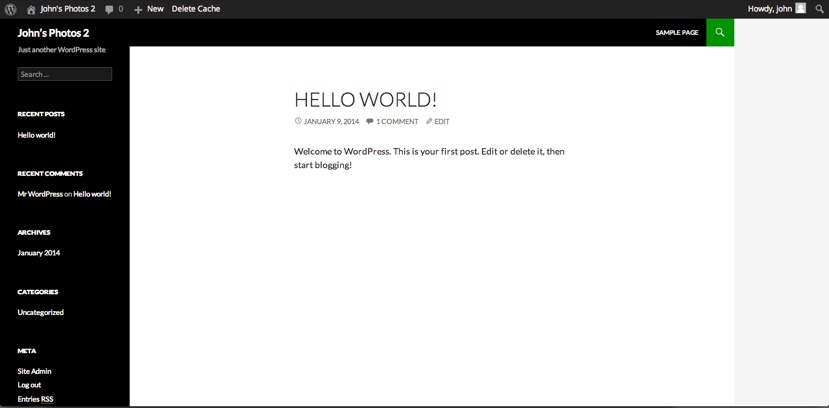
At this point, WordPress is installed on your domain. If you visit http://YourDomainName.com you should see your blog. It should looks something like this:
Now you’ll need to configure the basic settings for your blog. To do so, visit your admin page (also called Dashboard):
http://YourDomainName.com/wp-admin
We’ll now change some basic settings for better performance, UI, overall look, SEO, and more. On the left menu of your WP Dashboard, click:
SETTINGS
Add the ‘www‘ prefix to your URL (if you missed that part during the installation), go to SETTINGS / GENERAL / For both WordPress Address (URL) and Site Address (URL) add www. (so it’s http://www.YourDomainName.com instead of http://YourDomainName.com).
Under SETTINGS / GENERAL / Timezone – pick your city or timezone or nearby major city (Los Angeles, New York, etc); For Los angeles, for example, you can just start typing LOS and it will bring up LA. Hit Save Changes at the bottom. Notice that this will most likely log you out (adding the www.) so you’ll need to log back in.
Next, under SETTINGS / GENERAL you should edit/change your site’s title and tagline. Viewers should be able to get what your blog is all about from your title within a couple of seconds of reading it. Creativity is great but it’s more important viewers know almost immediately what to expect in your blog. The tagline might be used more creatively and/or you might want to somehow include your name in it.
SETTINGS / DISCUSSION / Before a comment appears / Uncheck the box: Comment author must have a previously approved comment (it’s a pain in the neck to moderate each comment and a good anti-spam plugin (which we’ll install later) will do the trick instead.
SETTINGS / DISCUSSION / Comment Moderation
Click here and copy/paste this list of words into the FIRST Comment Moderation box.
(the list is originated from the GitHub Comment Blacklist for WordPress project)
NOTE that pasting the long list might take a few seconds so it might look like your computer is frozen for a sec; be patient. Hit SAVE CHANGES at the bottom.
SETTINGS / PERMALINKS / Common Settings – Check ‘Custom Structure‘ and copy/paste this:
/%category%/%postname%
SAVE CHANGES.
httpv://www.youtube.com/watch?v=RfI1ArtfnTc
5. Installing & Activating Plugins:
On the left menu, under PLUGINS / click Installed Plugins. You’ll notice that the one-click WordPress installation already installed for you a few plugins. To be honest with you, aside from the Akismet plugin (comes with most installations), the rest of the plugins auto-installed are junk in my opinion so lets remove them by checking the box right next to all of them (except the Akismet), changing the Bulk Action box at the top to Deactivate and hit Apply. Then, check them again and change the Bulk Action box to Delete, hit Apply –> Delete these files and data.
There are million and a half plugins out there but it’s important not to install/activate too many, or your blog will become super slow. I’ve composed a list of (what I think are) the top / must-have plugins every WordPress blog should have. To install/activate them all at once, we will use a plugin called Wp Favs – Plugin Manager (otherwise, you will have to install/activate each of them manually).
PLUGINS / ADD NEW / use the search box in the top-right corner to find: Wp Favs, install the Wp-Favs Plugin Manager and then activate it. Once you do, on the left menu, under TOOLS, you should see a new tab called Wp Favs. Click it, and in the Quick Key (second box) copy/paste the following API Code: d86a99dcf3a01a0bc50f0445fba33f0f
Hit the blue Quick Load and once you see the list of recommended plugins, click “Run This List” (below the Title). Next, check the little box next to “Plugin Name” (which will auto-check all the boxes below for you) and change the Bulk Action to Install. Hit Apply (just once) and wait. It might take a few seconds for all the plugins to be installed so wait patiently. Don’t click Install again… 🙂
Once they are all installed, click the Plugins tab on the left menu, check the little box next to “Plugin Name” (which will auto-check all the boxes below for you) and change the Bulk Action to Activate and hit Apply.
NOTE that as soon as you activate all the plugins, you will be prompt to set them up for the first time (lots of pop-ups, etc). For most of them, you can just click Okay, DISMISS, Enable Auto-Update or No Thanks to get rid of all the annoying messages on the top of your Dashboard.
In some cases, some of the plugins won’t automatically activate – head over the PLUGINS on the left many, and manually activate all the ones that were not auto-activated. You might also notice that some plugins already have updates – it is recommended to update to the latest versions for security reasons.
6. Plugin Setup & Optimization:
Some of the plugins you just installed require initial setup and/or configuration. In this section I will go over some of these initial plugin setup. With each of the plugins, I’ve included links with more info in cases, if you want to learn more about what they do.
On the left menu, under SETTINGS:
Akismet Anti-Spam
This plugin will help in preventing spam on your blog’s comments section. To get it working, you’ll need to generate an API code. Under SETTINGS / AKISMET click the blue “Get your API key” and follow the steps to create an account with Akismet. Then, copy/paste the API key you get from them to your blog’s Akismet settings. If you’re struggling with it, there are lots of videos on Youtube, like this one, on how to set it up.
WP-Optimize Plugin
WP-Optimize (not under SETTINGS, below it) / click the plugin’s SETTINGS tab (not the SETTINGS on the main WordPress’ menu, but at the top of the page after you clicked the WP-Optimize). Under the Scheduled Clean-up Settings, check the Enable scheduled clean-up and optimization. Next, check Optimize Database Tables (in addition to everything else that’s checked) and hit the blue Save Settings. You can find more detailed info about this plugin here.
UpdraftPlus Backup Plugin
This plugin will backup your entire blog (database, images, posts, pages, etc) regularly but we’ll need to set it up for auto-backup. Under SETTINGS > UpdraftPlus Backup click the Settings tab (of the plugin, not the SETTINGS on the left menu) and change both the ‘Files backup schedule’ and the ‘Database backup schedule’ from Manual to Weekly. Then, change the ‘retain this many scheduled backups’ from 2 to 4 so you always have a month worth of backups. Scroll down and hit Save Changes.
Autoptimize
This is another great plugin to optimize/speedup your blog. Head over to SETTINGS > Autoptimize, scroll down its Main tab and check all three boxes (HTML, JavaScript and CSS). Hit the blue ‘Save Changes and Empty Cache‘.
Really Simple SSL
Really Simple SSL automatically detects your settings and configures your website to run over https instead of http. SSL provides data encryption, data integrity and authentication so your site is safer. Starting July 2018, Google marks every site that’s not on SSL as “Not Secure”. To Activate your SSL head over to SETTINGS > SSL and click “Go ahead, activate SSL!” If you refresh the page you’ll notice you’re now logged out and need to log back in to your Dashboard. Once you do, you’ll see that your URL is now using HTTPS instead of HTTP.
7. Installing a theme for your blog
Before you install a new theme on your WordPress blog, a few things to consider:
- Find a theme that you like – consider the overall look, the number of columns, the size of different elements on the page (logo, images, widgets, etc).
- More important than finding a theme you like, is finding a theme that supports your branding statement. Is the theme helping you brand yourself / your business the way you want it to? What does it communicate about you/your brand visually? Is it too busy? Does it look professional?
- If your blog is a content-based blog (i.e. mostly text, as opposed to a portfolio blog where photographs or designers show their visual work), find a theme that’s dark text over light background (black text over white background is ideal but other colors can work as well, as long as it’s easy to read). It’s hard to read white text over black background.
- I recommend a 2-column theme (main column, where your copy will appear, and a sidebar as a second column). A 3-column theme tends to narrow the main copy column, making it hard to read (plus they are a lot more cluttered and seem too busy visually).
To install a theme, on the left menu of your WP Dashboard, under Appearance, click Themes.
One way to search for a theme is to click the Add New button (top bar) and browse for the right theme using the Search, Featured, Newest, etc tabs. I don’t recommend this option since WordPress’ built-in theme database is very limited and not very creative.
A better alternative to WordPress’ built-in theme catalog is to search for a more recent, SEO optimized, beautifully designed theme on the web.
Here’s the google search I use.
8. Howto Blog:
Understand Blogs – Blogs in Plain English:
httpv://www.youtube.com/watch?v=NN2I1pWXjXI
Understand Categories and Tags:
httpv://www.youtube.com/watch?v=X6qfz9T1HfE
Understand the difference between post, page, category and Tags:
httpv://www.youtube.com/watch?v=K5Ewg3QEY74
Adding/writing a new post:
httpv://www.youtube.com/watch?v=vccJHRLgWR8
Adding/writing a new page (vs. post):
httpv://www.youtube.com/watch?v=rTDRagRBiWI